Onsite digital mapping for mineral exploration
Mineral exploration has always depended on maps. What has changed is the amount of information that can now be carried into the field — and used even when there is no cellular service.
A modern phone or tablet can hold dozens of geospatial layers covering geology, mineral occurrences, historic exploration work, land ownership, terrain, geophysics, access roads, environmental restrictions, and property boundaries. With apps like Gaia GPS, QField, or Avenza, those layers can be downloaded ahead of time and used offline. For teams working in remote country, the effect is straightforward: instead of relying on a single paper map, the field crew can compare multiple datasets while standing directly on the ground being evaluated.
The difference between seeing data and seeing context
Most exploration data is first reviewed from an office. A prospector examines a historical assessment report, identifies anomalous samples, scans nearby occurrences, and inspects a property on satellite imagery. A geologist interprets regional structures, lithological contacts, geophysical trends, and mapped faults before planning a program.
That desktop work is important, but it does not replace onsite observation. A line drawn on a geological map may be a fault, a contact, or an interpretation. In the field, it may correspond to a creek, a cliff, a road cut, an alteration zone, or a subtle change in vegetation. A historical sample coordinate may look precise on a screen and turn out to be on a steep slope, beneath dense forest, or hundreds of metres from the feature described in the report.
Onsite digital mapping connects the existing data to physical reality. By viewing several layers while walking the property, explorers can evaluate how geological interpretations, historic results, topography, access, and land restrictions relate to one another. Insights that are almost impossible to recognize from a desktop become obvious on the ground.
A field map is a stack of decisions
Think of a good offline project as five stacked layers. Each answers a different question, and each has to be preloaded before you leave cell service.
| Layer | What it contains | Question it answers |
|---|---|---|
| Field observations | Samples, photos, notes, tracks | What did we actually see today? |
| Exploration evidence | Historic samples, MINFILE, geophysics | What did earlier work already find here? |
| Geology & terrain | Bedrock, faults, LiDAR, slope, hydrology | What is the ground telling us? |
| Land status | Claims, private parcels, reserves, protected areas | Where can we legally work? |
| Navigation base | Satellite, topo, roads, trails | How do we get there and back? |
Why offline capability matters
Mineral properties are usually beyond reliable cellular coverage. Even areas close to established communities contain valleys, mountain slopes, and forest-service roads with little or no reception. A mapping system that depends on a live connection is nearly useless once the crew leaves the highway.
Before travelling to a property, download every relevant basemap and project layer for offline use — satellite imagery, topographic maps, elevation shading, roads, trails, claim boundaries, sample locations, and any custom exploration data. Once cached, the device GPS keeps working without a signal, and observations, photos, waypoints, and tracks can all be recorded for later review.
Useful mapping layers for mineral exploration
The value of a field-mapping app comes from the combination of layers loaded into it. No single dataset provides a complete picture. The best systems combine geological, historical, legal, environmental, and logistical information.
LiDAR and high-resolution elevation
LiDAR-derived terrain models reveal subtle surface features that are difficult to identify from satellite imagery or conventional topo maps. Because LiDAR can be processed to reduce the visual effect of vegetation, it is especially valuable in heavily forested areas — exposing historic trenches, pits, shafts, adits, waste piles, old roads and benches, fault-controlled valleys, lineaments, escarpments, and slope breaks.
LiDAR does not identify mineralization directly, but it exposes the surface expression of structures and historic human activity. Review multiple hillshade directions where possible: a feature that is invisible under one simulated illumination angle can be obvious under another.
Mineral claim and tenure boundaries
Claim layers show whether a target, outcrop, sample site, or historical working sits inside the property being evaluated, and they reveal neighbouring claims and nearby open ground. Consumer GPS positions are not a legal survey — accuracy varies with terrain, canopy, satellite geometry, and hardware — so use claim layers for planning and orientation, and the official registry for consequential boundary decisions.
Land ownership, parks and protected areas
Holding a mineral claim does not automatically grant surface access. Private property, leased land, agricultural parcels, and municipal land may exist within or around a tenure. Layer in national and provincial parks, ecological reserves, conservancies, First Nations reserve lands, community watersheds, and old-growth management areas so the team can plan respectful access routes and confirm restrictions before sampling or vehicle use.
Historic samples, occurrences and workings
Historic geochemistry includes rock, soil, stream-sediment, silt, till, heavy-mineral concentrate, trench, channel, drill-collar, and placer samples. Each point can carry a sample number, commodity, analytical results, year, source report, and field description. Known showings, prospects, past-producing mines, shafts, adits, trenches, and drill programs provide regional context and can identify mineralized trends or under-explored extensions.
Older coordinates should be treated as search centres, not exact positions. Many were derived from paper maps, compass traverses, local grids, or manual coordinate conversions. In the field, assess the surrounding terrain, drainage, glacial transport direction, and the original written description.
Geology, geophysics and imagery
Bedrock and surficial geology, faults, folds, alteration, magnetics, radiometrics, VLF and gravity all support target generation. Satellite and aerial imagery support access and terrain interpretation — roads, cutblocks, exposures, stream crossings, wetlands, recent disturbance, and burn areas. Historical imagery often preserves roads, trenches, drill pads, or clearings that have since become overgrown.
Roads, water crossings and infrastructure
Access layers include public roads, forest-service and resource roads, deactivated roads, trails, bridges, gates, railways, power lines, pipelines, cutblocks, and potential helicopter landing areas. Mapped roads should never be assumed to be passable — record washouts, gates, overgrowth, turnaround points, parking locations, hazards, and safe crossings so the next visit begins with better information.
Combining layers is more powerful than viewing them individually
The main advantage of digital field mapping is not access to any single layer. It is the ability to compare several layers at the same location.
Consider a target where a historical rock sample returned anomalous gold, the point lies near a mapped fault, LiDAR shows a parallel linear depression, regional magnetics show a break on the same trend, an old trench is visible on the slope, and satellite imagery reveals an overgrown access road. Each observation is useful by itself. Together, they form a much stronger exploration hypothesis.
The field team can walk the interpreted structure, inspect the trench, verify the rock type, collect samples, and determine whether the target represents a meaningful mineralized trend. This is where onsite mapping becomes more than navigation — it becomes an active exploration and decision-making system.
Recording new field data
A good field map should not be static. It should become more valuable with every site visit. Useful observations include outcrop locations, lithology, alteration, mineralization, structural measurements, sample numbers, photographs, float occurrences, soil conditions, overburden depth, historic workings, access conditions, water sources, hazards, and follow-up targets.
Consistent naming and symbology are essential. Establish standard waypoint types, colours, abbreviations, and note formats before the program begins. Every physical sample should have a corresponding digital record.
Preparing a field-mapping package
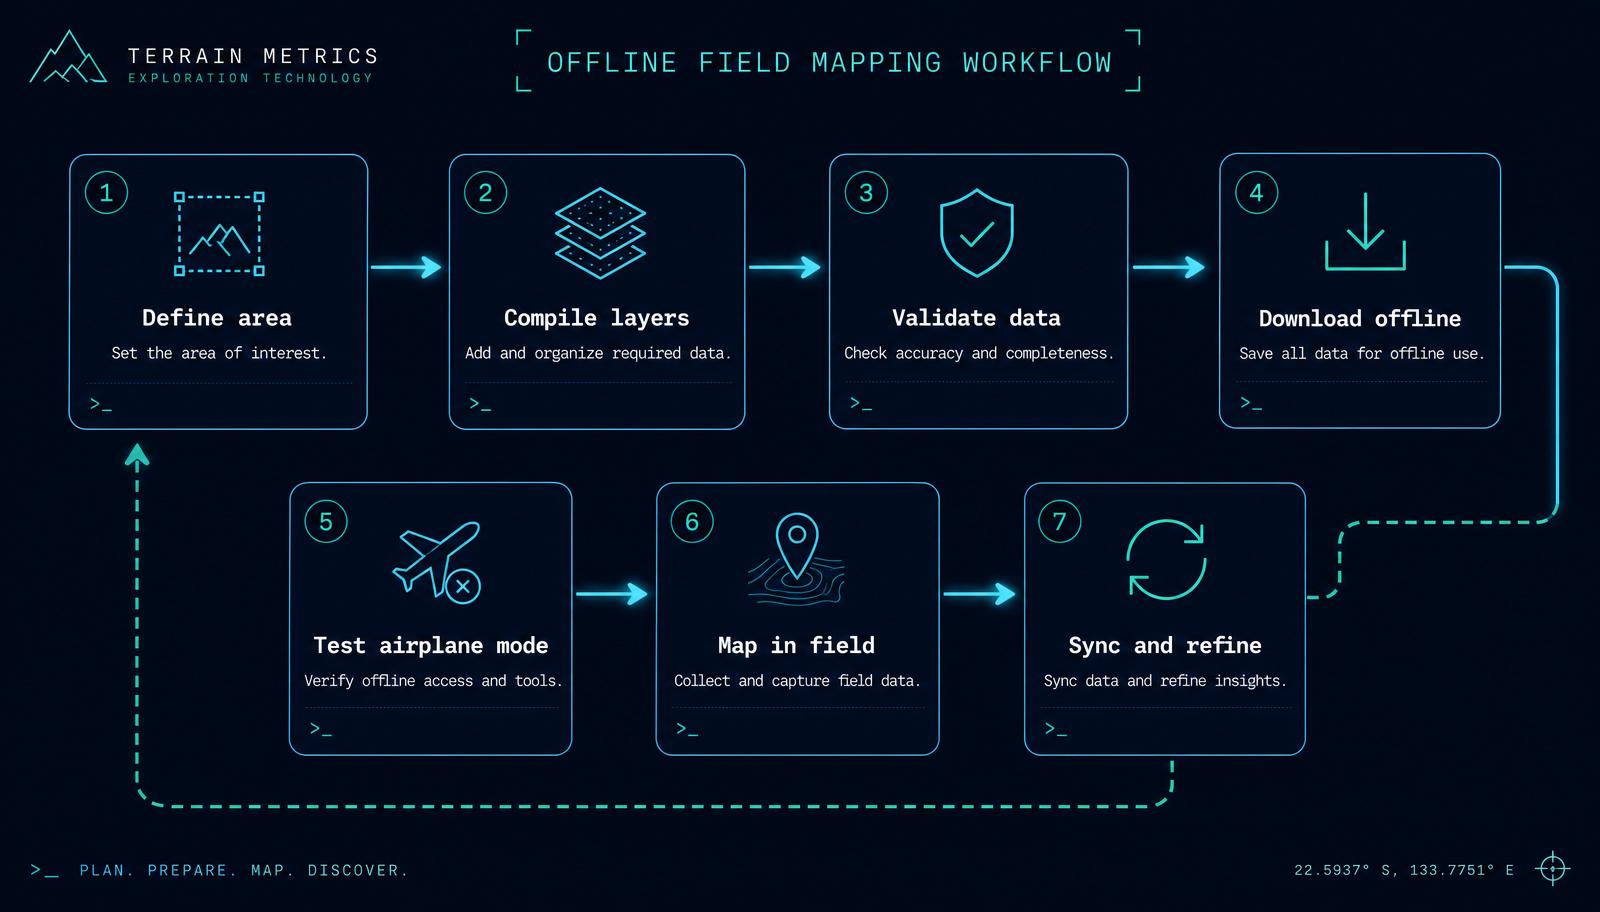
The workflow is straightforward, but every step matters. Skipping one is how field programs quietly lose a day.
- 1Define the area
Draw the property and a buffer around the target and access routes.
- 2Compile the layers
Load satellite and topo basemaps, current mineral-tenure boundaries, private-land, reserve, park and protected-area boundaries, historical samples, occurrences, workings, drill collars, geology, faults, LiDAR products, geophysics, hydrology, and roads.
- 3Validate the data
Confirm coordinate systems, datums, layer alignment, and data freshness. Check every imported dataset against a known reference feature.
- 4Download offline
Cache basemaps and project files at the zoom levels you will actually use. Create proposed traverses and target waypoints in advance.
- 5Test airplane mode
On Wi-Fi at home, put the device in airplane mode. Pan across the entire area, open every critical layer, confirm nothing is merely cached from the network.
- 6Map in the field
Capture samples, photos, structural measurements, outcrop notes, access conditions, and tracks. Keep symbology consistent with the plan.
- 7Sync and refine
Back up the day's data, review gaps, retarget for the next traverse. Every field day should improve the next field map.
Common limitations and mistakes
Outdated data
Claim status, road conditions, land ownership, park boundaries, and access restrictions all change. Refresh the important layers before every field program.
Coordinate-system errors
Different sources deliver data in different projections and datums. A conversion error can shift points hundreds of metres or drop them in the wrong region entirely. Check every imported dataset against a known reference feature.
Poor historical coordinates
Older samples and workings are often approximate. Search the surrounding area and consult the original description rather than assuming the point is exact.
Layer clutter
Displaying every dataset at once makes the map unreadable. Group layers logically and turn them on only when they answer the decision at hand.
Battery dependence
Continuous GPS, bright screens, large imagery caches, and cold temperatures drain batteries quickly. Power banks, cables, and a backup device belong in the field kit.
Treating consumer GPS as survey-grade
A phone or handheld GPS is a valuable navigation and documentation tool. It is not a legal boundary instrument, and it should not be used as one.
Effective exploration depends on combining historical knowledge, modern datasets, geological reasoning, and direct observation. Onsite mapping is where those four things finally meet.
The properties D10 evaluates carry decades of fragmented data. The engine ranks them at scale — and when a field team steps onto the ground, the same layers travel with them, offline, so the decision made at the outcrop is informed by everything that came before it.